Posts

Showing posts from May, 2016

Distance vector and link state Routing Protocol

Image
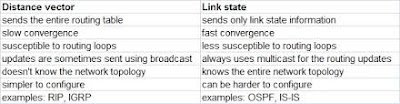
Two major classes of routing protocol ေတြကေတာ႔ distance vector and link-state ပဲျဖစ္ပါတယ္။Distance Vector" and "Link State" ေတြကို networks ေတြႀကားမွာroutersေတြက  packets ေတြကို    forwardလုပ္တဲ႔ေနရာမွာသံုးတဲ႔    routing protocols ေတြကို describe လုပ္ဖို႔သံုးတယ္။  အခ်ိဳ႔  routing protocol ေတြရဲ႔ ရည္ရြယ္ခ်က္က a destinationေရာက္ဖို႔႔၊ all network paths ေတြမွ a destination networkကိုေရာက္ဖို႔ the best path ကိုေရြးဖို႔ သံုးတဲ႔  all network paths ေတြအားလံုးရဲ႕  informationေတြကို   dynamically communicate လုပ္ဖို ႔ျဖစ္တယ္။ The terms distance vector and link state   ေတြကို    a distance metric (the distance) and an interface (the vector)ေပၚမွာအေျခခံျပီးthe best routing pathေတြေရြးတဲ႔the routing protocolေပၚမွာမွ ထက္ျပီး အေျခခံတဲ႔two broad categories ထဲမွာrouting protocols ေတြကို group လုပ္ဖို႔ ၊ the state of each link in a pathကို calculating လုပ္ျခင္းျဖင္႔႔ ႏွင္႔ the destinationကိုေရာက္ဖို႔  the lowest total metricျဖစ္တဲ႔   the pathကို ရွာျခင္းျဖင္ the best routing pathကို ေ

Subnetting

Image
A  subnetwork , or   subnet   ဆိုတာက IP network  ရဲ႔  logical, visible subdivision ျဖစ္တယ္။ႏွစ္ခု(သို႔)ႏွစ္ခုထက္ပိုေသာ  networks သို႔  a network တစ္ခုကိုခဲြျခမ္းျခင္းကို  subnetting လို႔ေခၚပါတယ္။ Each IP class ေတြကို  prefixed number of Networks and prefixed number of Hosts per networkရွိတဲ႔  အဲ႔  IP class ေတြနဲ႔  bounds လုပ္ထားတဲ႔ သူရဲ႔ ကိုယ္ပိုင္  default subnet mask နဲ႔ ျဖည္႔စြက္တပ္ဆင္ထားတယ္။ Classful IP addressingက  number of Hosts per Network or more Networks per IP Class ျဖစ္မွူကို  flexibility ျဖစ္ေအာင္ ေထာက္ပံ႔မေပးပါဘူး။ CIDR or   Classless Inter Domain Routing ကေတာ႔  Subnetသံုးျပီးေ ထာက္ပံ႔ေပးနိုင္ပါတယ္။ subnetting သံုးျခင္းျဖင္႔ one single Class A IP address ကို better network management capabilities အျပည္႔နဲ႔ smaller sub-networks ရဖို႔ သံုးနိုင္တယ္။ Class A Subnets Class Aမွာthe first octet ကိုသာ Network identifier and rest of three octets ေတြကို Hostsေတြအတြက္ assigned လုပ္ဖို႔သံုးတယ္။Class Aမွာmore subnetလုပ္ဖို႔bitsေတြကိုHost partမွ  borrowedလုပ္ရတယ္။ the sub

Static Routing Protocol

Image
Static routing ဆိုတာ router တစ္ခုမွာ routing entryေတြကို  manually-configured  လုပ္ရတဲ႔  routing protocol တစ္ခုျဖစ္ပါတယ္။ static routes  ေတြကို network administrator ေတြက  adding in entries into a routing table လုပ္ျခင္းျဖင္႔ configured လုပ္ႀကတယ္။ dynamic routing ေတြနဲ႔မတူတာက static routes ေတြကို network ကို changed လုပ္လည္း  change မျဖစ္ဘူး၊ reconfigured လုပ္မွ change တယ္။static routing ႏွင္႔dynamic routing ကႏွစ္ဦးႏွစ္ဖက္သီးသန္႔မဟုတ္ပါဘူး။ Both dynamic routing and static routing ေတြကို router တစ္ခုေပၚမွာ  routing efficiency ေတြကိုျမွင္႔ဖို႔နဲ႔  dynamic routing information ေတြ  exchanged လုပ္ဖို႔  failsျဖစ္တဲ႔အခ်ိန္မွာ  backups ေတြကို provideလုပ္ဖို႔ သံုးတယ္။ Static routingေတြကို  stub networks ေတြမွာ နဲ႔  a gateway of last resortကို  provideဖို႔သံုးတယ္။ Static routing may have the following uses: Static routing ေတြကို  other routesေတြကိုမလိုတဲ႔အခ်ိန္မွာ an exit point from a router ကို  defineလုပ္ဖို႔သံုးတယ္။ one or two routesပဲလိုတဲ႔ small networksေတြမွာလဲသံုးတယ္။  

Routed And Routing Protocol

Image
A routed protocol ဆိုတာ data  ေတြကို routed ေပးနိုင္တဲ႔ protocol တစ္ခုျဖစ္တယ္။ Routed protocol ေတြကေတာ႔ IP, AppleTalk, and IPX ေတြပါ၊အဲ႔ဒီ protocol ေတြမွာ an addressing scheme and subnetting ရွိဖို႔လိုတယ္။  Addressing scheme ကို ဘယ္ host ေတြကို ဘယ္ network မွာရွိေနမွာကိုဆံုးျဖတ္ဖို႔နဲ႔  particular networkေပၚမွာ host ေတြကို   identifying လုပ္ဖို႔သံုးပါတယ္။ All hosts on an internetwork ေတြက  the services of a routed protocol  ေတြကိုသံုးေနၿကတယ္။ ဒါက router မ်ား, server, workstations ကိုဆိုလိုသည္။ IP and IPX ေတြဟာယေန႔ခတ္မွာအသံုးမ်ားတဲ႔ protocol မ်ားျဖစ္တယ္။ဒါေပမယ္႔ IPX ကို cisco exam မွ ျဖဳတ္လိုက္ျပီးယေန႔ေခတ္ သိပ္မသံုးေတာ႔ပါဘူး။ IP routed protocol တစ္ခုပဲ အာရံုစိုက္ဖို႔လိုပါတယ္။ A routing protocol ကကြဲျကားပါတယ္။ Router ႏွစ္ခုႀကားမွာပဲသံုးတယ္။အဲ႔တာက  routing tables ေတြကို build and  maintain လုပ္ေပးတယ္။  three classes of routing protocols ေတြက 1)distance vector, 2)link state,3)hybrid ေတြပဲျဖစ္ပါတယ္။ OSPF က link stateအမ်ိဳးအစားထဲက တစ္ခုပါ။ေနာ္တစ္ခုက IS-IS ေပါ႔။ EIGRP ကေတာ႔ hybird တစ္

Fixing IP address already assigned to another adapter error in VMware

Image
VM virtual network adapter ကို upgrade လုပ္လိုက္လို႔ျဖစ္ေစ သို႔မဟုတ္ VM migrate လုပ္တဲ့အခါ Version အေဟာင္းကေန အသစ္ကို ေျပာင္းတဲ့အခ်ိန္ျဖစ္ေစ Network adapter ေတြကို ႀကိမ္ဖန္မ်ားစြာ Add, Remove လုပ္လို႔ျဖစ္ေစ Phisical Machine ကေန Virutal Machine ကို ေျပာင္းတဲ့အခါျဖစ္ေစ ေအာက္က Error မ်ိဳး ၾကဳံေတြ႕ရနိုင္ ႀကံဳေတြ႕ရတတ္ပါတယ္။ တကယ္ေတာ့ ဒီ Error မ်ိဳးက ghosted network adapter လို႔ေခၚတဲ့ device manager မွာ hidden ျဖစ္ေနတဲ့ network adapter ေၾကာင့္ျဖစ္ေနတာပါ။ Device Manager ကေန Show hidden device လုပ္႐ုံနဲ႔ ျပႆနာ ေျပလည္ေလ့မရွိတတ္ပါဘူး။ ဒီေတာ့ ဒီျပႆနာ ကို ေျဖရွင္းနည္းေလး ေဝမၽွလိုက္ပါတယ္။ Command Prompt ကေန ၿပီး ေအာက္က command ရိုက္ထည့္ပါ။ set devmgr_show_nonpresent_devices=1 တကယ္လို႔ သင့္ Server က Windows 2000 / 2003 ဆိုရင္ေတာ့ Environment Variables ကို ျပင္ေပးမွ ghosted network adapter ကို device manager မွာ ျမင္ရမွာပါ။ လုပ္နည္းကေတာ့ေတာ့... My computer> Properties>Advanced Tab>Environment Variables>System variables>New ကေနၿပီး set devmgr_show_nonp

Network Virtualization

Image
Cloud Computing ေခတ္မွာ Server ေတြကို Virtualize လုပ္ၿပီး အသုံးျပဳလာၾကပါၿပီ။ Server Virtualization လုပ္ၿပီဆိုတာနဲ႔ ေအာက္က ျပႆနာေလးေတြ ၾကဳံရပါၿပီ။ ၁) Routing and Switching Problem Virtual Switch တခုဖန္တီးၿပီး VLAN ေတြ ထပ္တိုးဖို႔လိုလာၿပီဆိုတာနဲ႔ ေျပးျမင္ရမွာက Routing ပိုင္းပါ။ အခ်ိန္နဲ႔ တေျပးညီ Routing ကို update လုပ္ဖို႔ဆိုတာ သိပ္လြယ္လွတဲ့အလုပ္မဟုတ္ပါဘူး။ ၂) Firewall Services လုပ္ငန္း လိုအပ္ခ်က္အရ Application အသစ္ေတြ၊ Project အသစ္ေတြ၊ Network အသစ္ေတြထပ္တိုးဖို႔လိုအပ္လာလို႔ ထပ္တိုးၿပီဆိုပါစို႔။ ၄င္းအသစ္အသစ္ေတြအတြက္ Security ပိုင္းလိုအပ္ခ်က္ေတြ ေပၚလာတတ္ျမဲပါ။ ဒီအတြက္ Firewall ရဲ့ Rule ေတြကို အခ်ိန္နဲ႔ တေျပးညီ အသစ္တိုင္းအတြက္ update လုပ္ဖို႔ဆိုတာလဲ ခက္ခဲတဲ့ ကိစၥတခုပါပဲ။ ၃) Load Balancing Server အသစ္ေတြ Service အသစ္ေတြအတြက္ လိုအပ္တဲ့ Load Balancing ဆိုတာကလဲ Physical Load Balancer ေတြအတြက္ ေခါင္းခဲေစတဲ့ ကိစၥပါပဲ။ ၄) VPN Services Physical VPN hardware service ကို သုံးထားတဲ့ Company အတြက္ အသစ္အသစ္ေတြအတြက္ scale လုပ္ဖို႔ ခက္ခဲေစပါတယ္။ Server Virtualize မပ

Third-party software မ်ားမလိုဘဲ Windows ေပၚတြင္ Hotspot တစ္ခုဖန္တီးျခင္း

Image
Windows Operating System အသံုးျပဳသူမ်ား မိမိ၏ Laptop သို႔မဟုတ္ PC ေပၚကေန Hotspot တစ္ခုကို ဖန္တီးျပဳလုပ္ခ်င္တယ္ဆိုရင္ အျခား Third party ေဆာ့ဖ္ဝဲမ်ားကိုအသံုးျပဳရန္မလုိအပ္ဘဲ Netsh command ကို အသံုးျပဳၿပီး Hotspot တစ္ခုကို ဖန္တီးျပဳလုပ္ႏိုင္ပါတယ္။ Netsh ဟာ Windows NT ေပၚမွာ အေျခခံထားတဲ့ Microsoft ရဲ႕ Network command တစ္ခုျဖစ္တဲ့ အတြက္ Windows NT ကိုအေျခခံ ၿပီး ထုတ္လုပ္ထားတဲ့ Operating System ေတြမွာ အဆိုပါ command ကို အသံုးျပဳႏိုင္ပါတယ္။ Windows 7 ကေန Windows 10 အထိ Hotspot တစ္ခုကိုဖန္တီးျပဳုလုပ္ခ်င္တယ္ဆိုရင္ ပထမဦးဆံုး Command Prompt ကို Administrator mode နဲ႔ Run လိုက္ပါ။ Windows 7 မွာဆိုရင္ေတာ့ Start button ကို ႏွိပ္ၿပီး cmd လို႔ ရိုက္လိုက္ပါ Command prompt ေပၚလာရင္ Right Click ျပဳလုပ္ၿပီး Run administrator ဆိုတာကိုေရြးခ်ယ္ၿပီး Run ရပါမယ္။ Windows 8 ႏွင့္ Windows 10 တို႔ေပၚမွာဆိုရင္ေတာ့ Win + X key ကို ႏွိပ္လိုက္ပါ။ ၿပီးရင္ Command Prompt (Admin) ဆိုတာကို ေရြးခ်ယ္ေပးရပါမယ္။ Command prompt ကို Admin mode နဲ႔ Run ထားရင္ c:\windows\system ဆိုတဲ့လမ္းေၾကာင္း ေအာက္ကိ

iOS 9 တြင္ Passcode ေက်ာ္၍ ဖုန္း Contact မ်ားအတြင္းသို႔ ဝင္ေရာက္ျခင္း

Image
iOS 9 အသံုးျပဳ ဖုန္းေတြမွာ ျပဳလုပ္ထားတဲ့ Passcode Lock ကိုေက်ာ္ၿပီး ဖုန္းထဲမွာရွိတဲ့ Contact ေတြထဲသို႔ဝင္ေရာက္ အသံုးျပဳႏိုင္ေသာ နည္းလမ္းျဖစ္သည္။ iOS 9 ၏အားနည္းခ်က္ တစ္ခုျဖစ္ၿပီး ယင္းလုပ္ေဆာင္ခ်က္မွာ iOS 8 Device မ်ားတြင္ ျပဳလုပ္၍ရႏိုင္မည္ မဟုတ္ပါ။ ဒါ့အျပင္ iOS 9 မွာဒီလိုမ်ိဳး Passcode ကိုေက်ာ္ၿပီး ဝင္ေရာက္ႏိုင္ဖို႔အတြက္ ဖုန္းမွာအင္တာနက္ ဖြင့္ထားဖို႔လိုအပ္မွာ ျဖစ္သလို  Siri  ကိုလည္း ဖြင့္ထားဖို႔ လိုအပ္ပါတယ္။ Siri ကိုပိတ္ထားရင္ Passcode ကိုယခုေဖာ္ျပမယ့္ နည္းလမ္းနဲ႔ေက်ာ္လို႔ မရႏိုင္တဲ့အျပင္ Siri ကို ဖြင့္ထားေပမယ့္လည္း အင္တာနက္ ပိတ္ထားခဲ့မယ္ဆိုရင္လည္း ဝင္လို႔မရႏိုင္ပါဘူး။ ဒါကေတာ့ Passcode ကို အလြယ္တကူ ေက်ာ္ဖို႔အတြက္ လိုအပ္တဲ့ အခ်က္အလက္ေတြပဲ ျဖစ္ပါတယ္။ ပထမဆံုးအေနနဲ႔ ဖုန္းမွာရွိေနတဲ့ Passcode ေနရာမွ 9 ေလးလံုး အရင္႐ိုက္လုိက္ပါ။ Passcode မဟုတ္တဲ့အတြက္ ပြင့္လာမွာ မဟုတ္ေသးပါဘူး။ 9 ေလးလံုး ႐ိုက္ၿပီးသြားတဲ့အခါမွာ 1 ေလးလံုး ထပ္႐ိုက္ပါ။ 1 ေလးလံုး ႐ိုက္ၿပီးခ်ိန္မွာ 3 ေလးလံုး ထပ္႐ိုက္ပါ။ 3 ေလးလံုး ႐ိုက္ၿပီးခ်ိန္မွာ 1 ေလးလံုးထပ္႐ိုက္ ပါ။ 1 ေလးလံုး ႐ိုက္ၿပီးရင္ေတာ့ဒီ ေနရာမွာ

VLAN အေႀကာင္းသိေကာင္းစရာ(1)

Image
                             Virtual LAN ဆိုတာ Local Area Network အတုတမ်ိဳးလို.ပဲလြယ္လြယ္ သတ္မွတ္ႏုိင္ပါတယ္။ ရွိႏွင့္ျပီးသားConnection ေပၚမွာ Logically ခြဲထုပ္လိုက္တာပါ။ အဲဒီအတြက္ၾကိဳးေတြ တျခား splitter ေတြမလိုပါဘူး။ VLAN ခြဲလိုက္ျခင္းအားျဖင့္ Logically အစုအဖြဲ.ေလးေတြ ကိုယ္စီတိုင္းမွာ ကုိယ္ပိုင္ Broadcast Domain ကုိယ္ပုိင္ Subnet ေတြ သတ္မွတ္လို.ရသြားပါတယ္။ Manage Switch ေတြမွာ VLAN assign လုပ္တဲ့အခါ Port Type ၂ မ်ိဳးပဲရွိပါတယ္။ Access Port ( for Device ) & Trunk Port ( for Uplink ) Switch အမ်ိဳးအစားေတြကြာသြားလို. အေခၚအေ၀ၚေတြကြဲခ်င္ကြဲသြားႏို္င္ေပမယ့္ Concept ကေတာ့အတူတူ ပါပဲ။ HP Switch နဲ. တျခားအမ်ိဳးအစား ေတာ္ေတာ္မ်ားမ်ားမွာေတာ့ Tagged & Untagged အသံုးျပဳျပီး Cisco Switch ေတြမွာေတာ့ Access & Trunk ကုိသံုးပါတယ္။ ထူးထူးျခားျခား PVID (Port VLAN ID) သံုးရတဲ့ H3C Switch အမ်ိဳးစား ၁ ခုၾကံဳခဲ့ဖူးပါတယ္ ၊ သာမာန္အားျဖင့္ Port တခုမွာ VLAN တခုပဲ Untagged လုပ္လို.ရေပမယ့္ H3C ကေတာ့ VLAN ေတာ္ေတာ္မ်ားမ်ား Untagged လုပ္ခြင့္ေပးထားပါတယ္ ၊ အဲဒီ Untagged VLAN ေတြထဲကမ

Windows 10 တြင္ Shutdown အျမန္ျပဳလုပ္ႏိုင္မည့္ နည္းလမ္းမ်ား

Image
Windows 10 အသံုးျပဳသူမ်ား ပံုမွန္ကြန္ပ်ဴတာကို ပိတ္သည့္အခါတြင္ Shutdown ျပဳလုပ္ရန္အတြက္ Start button ကို ႏွိပ္ၿပီးမွ Power Button ကို ႏွိပ္ကာ Shutdown ျပဳလုပ္ရမည္ျဖစ္သည္။ Windows 10 ေပၚ ကေန Shutdown ကို အလ်င္အျမန္ ျပဳလုပ္ခ်င္သူမ်ားအတြက္ ေအာက္ေဖာ္ျပပါ နည္းလမ္း သံုးခုမွ ႏွစ္သက္ ရာတစ္ခုကို ေရြးခ်ယ္ၿပီး အလ်င္အျမန္ျပဳလုပ္ႏိုင္မွာျဖစ္ပါတယ္။ ပထမ နည္လမ္းကေတာ့ Power Options ထဲက System Settings ထဲမွာ သြားေရာက္ ျပင္ဆင္ ႏိုင္မယ့္ နည္းလမ္းျဖစ္ပါတယ္။ System Settings ထဲမွာ When I press the power button ဆိုတဲ့ ေနရာကို ေရြးခ်ယ္လိုက္ပါ။ ၿပီးသြားရင္ Down Arrow button ကိုႏွိပ္ၿပီး Shut down ဆိုတာကိုေရြးခ်ယ္ေပး ရပါမယ္။ ဒီလုပ္ငန္းစဥ္ကေတာ့ ကြန္ပ်ဴတာကို Shut down ျပဳလုပ္လိုတဲ့အခါမွာ Power button ကို တစ္ခ်က္ ႏွိပ္လိုက္ရံုနဲ႔ Shut down ျပဳလုပ္ေပးမယ့္ နည္းလမ္းျဖစ္ပါတယ္။ ဒုတိယ နည္းလမ္းကေတာ့ Desktop ေပၚမွာ Shut down ျပဳလုပ္ဖို႔အတြက္ Shortcut ျပဳလုပ္ထား ႏိုင္တဲ့ နည္းလမ္းျဖစ္ပါတယ္။ Shut down Shortcut ျပဳလုပ္ဖို႔အတြက္ Desktop ေပၚမွာ Right-click ႏွိပ္ပါ။ ၿပီးသြားရင္ New > Shortcut ဆိုတာကိုေရြးခ်ယ္ေပး

Ubuntu OS မွာ Opera Browser ကို ဘယ္လို ထည့္သြင္းမလဲ

Image
Firefox browser ကို အသံုးမျပဳ ခ်င္ေတာ့တဲ့ သူေတြအေနနဲ႔ Ubuntu OS မွာ Opera  Browser ကို ထည့္သြင္းအသံုးျပဳနည္း ျဖစ္ပါတယ္။ Opera browser ကို Ubuntu OS မွာ ထည့္သြင္း အသံုးျပဳခ်င္ သူေတြအေနနဲ႔ ေအာက္ေဖာ္ျပပါ နည္းလမ္းမ်ားအတိုင္း ျပဳလုပ္ႏိုင္မွာ ျဖစ္ပါတယ္။ Ubuntu OS မွာ Opera browser ကို ထည့္သြင္းဖို႔အတြက္ ပထမဆံုး Ubuntu OS System ရဲ႕ Package ေတြကို Update ေတြ Upgrade ေတြ ျပဳလုပ္ထားသင့္ပါတယ္။ Package ေတြကို Update ျပဳလုပ္ဖို႔အတြက္ Ubuntu ရဲ႕ Terminal ကို Ctrl + Alt + T ကို အသံုးျပဳၿပီး ဖြင့္ရပါမယ္။ ၿပီးၿပီဆိုရင္ေတာ့ Terminal ထဲမွာ  sudo apt-get update ဆိုတဲ့ Command နဲ႔ Package ေတြ ကို  အရင္ Update ျပဳလုပ္ရမွာ ျဖစ္ပါတယ္။ Update ျပဳလုပ္ၿပီးၿပီ ဆိုရင္ေတာ့ sudo apt-get upgrade နဲ႔ Upgrade ထပ္မံလုပ္ေပးရပါမယ္။ ေနာက္တစ္ဆင့္ကေတာ့ Opera browser ကို Install ျပဳလုပ္ဖို႔အတြက္ Terminal မွာ ေဖာ္ျပပါ Command ေတြကို တစ္ေၾကာင္းခ်င္းစီ ႐ိုက္ထည့္ေပးရမွာ ျဖစ္ပါတယ္။ အသံုးျပဳရမယ့္ Command ေတြကေတာ့- sudo sh -c ‘wget -O - http://deb.opera.com/archive.key | apt-key add -’ ဆိုတဲ့ command ေတြ

Windows 10 တြင္ Start Menu ခလုတ္ အလုပ္မလုပ္သည့္ ျပႆသာနာေျဖရွင္းျခင္း

Image
Windows 10 တြင္ Start Menu ခလုတ္ အလုပ္မလုပ္သည့္ ျပႆနာကို ႀကံဳေတြ႕ရပါက ေအာက္ေဖာ္ျပပါ နည္းလမ္းအတိုင္း အလြယ္တကူနဲ႔ လုပ္ယူႏိုင္ပါတယ္။ အဆိုပါ ျပႆနာကို ႀကံဳေတြ႕ရပါက Powershell မွ ေျဖရွင္းရမွာ ျဖစ္ပါတယ္။ Powershell ကို ဖြင့္ရန္အတြက္ Start Meun ခလုတ္ရွိတဲ့ Taskbar ကို Right-click ျပဳလုပ္ၿပီး Task Manager ကို ဖြင့္ရပါမယ္။ File Menu ကို ႏွိပ္ၿပီး Run new task ဆိုတာကို ေရြးခ်ယ္လိုက္ပါ။ Create new task ဆိုတဲ့ box က်လာရင္ powershell ဆိုတဲ့ command ကို ႐ိုက္ထည့္ရပါမယ္။ command ကို ႐ိုက္ထည့္ၿပီးသြားရင္ Create this task with administrator privileges ဆိုတဲ့ေနရာမွာ အမွန္ျခစ္ ထည့္ေပးၿပီး powershell ကို ဖြင့္ႏိုင္ပါတယ္။ ေနာက္ထပ္ Powershell ကို အသံုးျပဳႏိုင္မယ့္ နည္းလမ္းကေတာ့ Start Menu button ကို Right-click ႏွိပ္ၿပီး Command Prompt (Admin) ဆုိတာကို ေရြးခ်ယ္လိုက္ပါ။ Command prompt ထဲေရာက္သြားၿပီဆိုရင္ powershell ဆိုတဲ့ command ကို ႐ိုက္ထည့္ရင္လည္း powershell ကို အသံုးျပဳႏိုင္ပါတယ္။ Powershell ထဲကိုေရာက္ၿပီဆိုရင္ Get-AppXPackage -AllUsers | Foreach {Add-AppxPackage -DisableDeve

Windows PC ေပၚတြင္ iOS device Screen ကို ခ်ိတ္ဆက္ အသံုးျပဳျခင္း

Image
iPhone, iPad ေပၚမွာ ျပဳလုပ္တဲ့ အရာေတြကို Windows အသံုးျပဳထားတဲ့ PC ေပၚကေန ၾကည့္႐ႈခ်င္ သူေတြအေနနဲ႔ ေအာက္ေဖာ္ျပပါ နည္းလမ္းနဲ႔ အလြယ္တကူ ျပဳလုပ္ႏိုင္မွာ ျဖစ္ပါတယ္။ iPhone, iPad  ေပၚကေန ဂိမ္းေဆာ့တာပဲျဖစ္ျဖစ္၊ ႐ုပ္ရွင္ၾကည့္႐ႈတဲ့ အခါမ်ိဳးမွာပဲျဖစ္ျဖစ္ Screen ေသးေသးေလးကေန မၾကည့္႐ႈခ်င္ သူမ်ားအတြက္ Airplay ကိုအသံုးျပဳၿပီး ကြန္ပ်ဴတာနဲ႔ ခ်ိတ္ဆက္ၾကည့္႐ႈ ႏိုင္မွာျဖစ္ပါတယ္။ အဆိုပါ လုပ္ငန္းစဥ္ကို ျပဳလုပ္ႏိုင္ဖို႔အတြက္ လိုအပ္တဲ့ အရာေတြကေတာ့ WiFi adapter နဲ႔ LonelyScreen ဆိုတဲ့ ေဆာ့ဖ္ဝဲလိုအပ္မွာ ျဖစ္ပါတယ္။ Lonely Screen ဆိုတဲ့ ေဆာ့ဖ္ဝဲကို http://www.lonelyscreen.com ဆိုတဲ့  ဝက္ဘ္ဆိုက္လိပ္စာမွာ အခမဲ့သြားေရာက္ ရယူႏိုင္မွာ ျဖစ္ပါတယ္။ ပထမဦးဆံုး အဆိုပါ ေဆာ့ဖ္ဝဲကို download ျပဳလုုပ္လိုက္ပါ။ Download ျပဳလုပ္ၿပီးသြားရင္ အဆိုပါ ေဆာ့ဖ္ဝဲကို ကြန္ပ်ဴတာအတြင္း Install ျပဳလုပ္ေပးရပါမယ္။ Install ျပဳလုပ္ၿပီးၿပီဆိုရင္ Windows Firewall က အဆိုပါ ေဆာ့ဖ္ဝဲကို Block မျပဳလုပ္ရန္အတြက္ Fix It (Administrator) ဆိုတဲ့ ခလုတ္ေလးကို ႏွိပ္ေပးရမွာ ျဖစ္ပါတယ္။ အဆိုပါအဆင့္ ၿပီးသြားၿပီဆိုရင္ အသံုးျပဳမယ့္ Server Na